How to Install Thin Brick on a Cement Front Porch Walkway
- Kelly Bazzle
- Nov 23, 2022
- 8 min read
Updated: Sep 3, 2025
Interested in doing a front porch brick install? You came to the right place. I'm going to take you along for this DIY project to give my front porch flooring a colonial-style makeover with the help of Old Mill Brick Company.
This project was so rewarding, but don't get me wrong, it was challenging at times. But, if I can do it, you can too!
The Brick
First, let's talk about the brick. I knew Old Mill Brick was the I decided on a running bond pattern (the most popular according to Old Mill Brick) in Olympus for our front porch. You can also order Old Mill thin Brickwebb sheets in the herringbone pattern. There's a very helpful pattern guide on the Old Mill Brick blog. Check it out here.
The first thing you need to do is choose a color and then you can pick the pattern. Then you're going to need to measure your space. The width times the length is going to be
the total square feet of your project. Then you'll know how much brick you need to order.

What You'll Need
• Thin Brickwebb Sheets from Old Mill Brick
• Modified Adhesive from Old Mill Brick
• Tile Saw to cut the bricks (I used my Worx Compact Circular saw which came with 2 tile cutting blades)
• Utility knife to cut the webbing of the brickwebb sheets
• Multi-purpose grout sponges
• 511 Impregnator Sealer
• Brush for the sealer
• Sanded Grout in the color of your choice (I picked bright white by Pollyblend Plus sold at Home Depot)
• Thinset and grout mixer for drill
• Heavy duty latex gloves
• Microfiber cleaning cloths
• Notched trowel
• Margin trowel
• Bucket
• Rubber grout floater
Here’s my shopping list for Home Depot (you can also click the image above and it will send you to my Home Depot shopping list on Like to Know it).
Prefer to shop at Lowe's? Not a problem! I shop there too (in-store and online). They carry the Old Mill Brick in Olympus and an updated version of the Old Mill Brick adhesive. Check out my shopping list on my Lowe's Creator Storefront.
How to Install
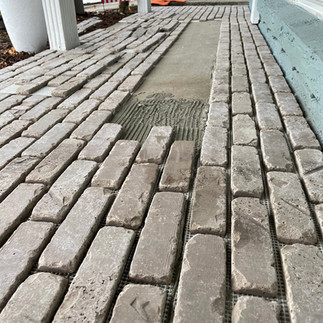
First things first! Sweep off and clean the area you’re planning to install the brick. I went ahead and pressure washed our front porch and let it dry before sweeping any leftover dust or mulch away. Once it was clear, it was time to grab my Old Mill Bricks and start mapping out my project. I wanted to give my walkway a definitive start and end so I put two rows of bricks in a different direction at the start of the walkway and at the end by our front door. Here’s a photo to show what I mean:

I wanted to map everything out so that it would make it easier to lay the thinset and place the bricks without taking any breaks to make cuts in the bricks. So I pre-cut the bricks and laid them in their designated places.
If you don’t have a work table, get this one by Worx. I found it to be the most helpful during this project because it comes with clamps and it folds up to save space. It’s so easy to set up, too. This is where I made the cuts with my circular saw. Be sure to wear a mask when you’re cutting, the dust will go everywhere.


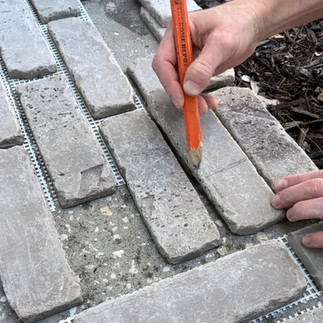
As far as removing the brick pieces from the webbing, it’s super easy. You just pull it off and it will come off from the webbing and you can pick off the extra glue leftover on the other side of the brick if you want. I only had to replace a few bricks along the way due to cracks (that I think I made from walking on the bricks while they were in place, so my advice, walk lightly haha).
After you've figured out your pattern and laid the brick to make sure you can cover the space, make sure that all of the dirt and debris has stayed away and get ready to lay the adhesive, aka the modified thin-set.
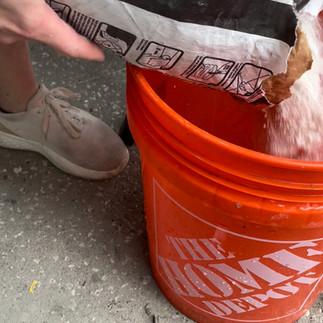
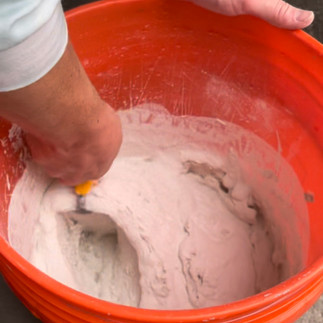
Thin-set tip: Add some water to the bucket first before pouring the thin-set powder into the bucket. (I was mixing half a bag at first to see how far it got me so I added about 2 inches of water to the bottom of my Home Depot bucket and then I poured the powder in and started mixing with my grout paddle) As you’re mixing, if it’s chunky and looking dry, add a little more water. You want the thin-set to be the consistency of peanut butter and once it’s there, let it sit for a few minutes before you start using it.
Lesson Learned Mixing Thin-Set
CLEAN YOUR PADDLE SO YOU CAN USE IT AGAIN TO MIX YOUR GROUT. That’s all. That’s the lesson.
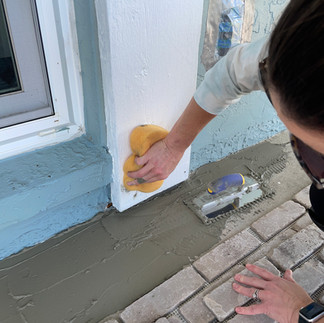
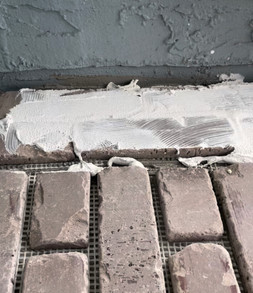
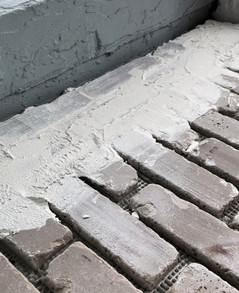
You will use a 3/8" notched trowel to spread the thin set. Scoop the thin-set out with the straight edge and push it around. You’ll find that you get into a pattern after a few times of doing this. It’s pretty satisfying, too.
Lesson Learned While Applying Brick Sheets To Thin-Set
This is why I write these blog posts. I think they can really help you with your project. So, I started on my edges first and tried to apply the thin-set by sections (bad idea because it was awkward with the webbing) but I found that it was much easier to apply the thin-set by rows of sheets. It was much easier to move a row of bricks over one row on top of the other bricks laid down and apply the thin-set in that pattern and then replace the bricks put aside and lay them on the thin-set. Also, keep a damp sponge nearby to wipe any thin-set that goes rogue and ends up where it’s not supposed to be.


Once you’re done laying the brick, make sure everything is how you want it, fix any crooked bricks and let it dry for 24 hours.
Ready to grout? Not so fast! There are two different ways you can grout these bricks. You can pipe it in between the bricks with a piping bag and smooth it out with a tool or you can do the floating method which means you’ll spread it all over the bricks and then wipe down the bricks with a floater and then with a sponge and a wet cloth to finish. I went with the “float” method because I wanted to give the brick walkway a softer and more worn look. I also wanted the grout to play a bit of a white wash role in this project.
So, before I started grouting, I wanted to make sure I protected the bricks with a sealer. Old Mill Brick recommends the 511 impregnator penetrating sealer because it helps protect the brick from stains and dirt. It won’t make the brick look wet or darker than it really is. It just protects it from what you’re about to do with the grout by floating it all over the brick. It really helps it when you’re wiping the grout away from the surface of the brick so that the brick color still shines through. At first it will look like it’s darker, but it dries and the true color of the brick shows up. The brick looks more yellow in my picture below, but that’s just from my front porch soft white lightbulb.


I applied the sealer with a paintbrush on each brick and let it dry overnight. This stuff goes a long way, so just pour some into a little handheld paint bucket and apply and add more when you need it but I didn’t even use half of the bottle doing this first protective coat. After the sealer dried overnight, I was ready to grout the next day!
I chose a white grout because I wanted to highlight the contrast of the bricks. I originally bought one bag of polyblend plus bright white sanded grout and found out I needed more after one bag only covered about a third of my walkway. But, I’m getting ahead of myself. Let’s talk about mixing the grout. Just follow the directions on the bag and get after it.
I added 2 quarts (8 cups according to Alexa 🤣) of water to my cleaned out bucket and then added the grout to the bucket. I hand-stirred this with the margin trowel for a good 3-5 minutes and really made sure I got through to the bottom of the mix to make sure it was mixed thoroughly. You could use a grout paddle with your drill, but this doofus (aka me) left that sitting out and the thin-set is forever stuck on the paddle now so I didn’t want to mix that with the pretty white grout and add any unnecessary specks in my grout. But, even the bag of grout shows someone hand-stirring, so I didn’t really mess up that much haha.


Now, We Grout!
Grab your bucket of grout, the floater, a bucket of water, a sponge, and a cleaning cloth.
Now, let’s do it! Don’t be nervous. You’ve got this. Using your margin trowel, scoop the grout and just throw it down on that brick. Spread it around with the margin trowel and then grab your floater and smooth it out. Once you have it smooth, let it sit and move on to the next section. After about 5 minutes, you’ll be able to wipe the bricks with a damp sponge to make sure you don’t let any grout specs stick to the tops of the bricks. You’ll have to change out your water multiple times to keep from creating too much of a white wash on your bricks.
Here are some pictures to show my process:


I should have been wearing my gloves, but I was just too excited to get started. I used gloves during the rest of the project because my hands started looking like raisins from the water.
So, back to the project… I used a damp sponge to wipe first and then you can use a cleaning cloth to really make the color of the brick come through. If there’s a section of grout that isn’t as smooth as you like, you have time to smooth it out. This grout will start firming up after about 10 minutes and then it’s really hard after a couple hours.
I also went back after 2 hours and wiped the bricks with a wet cloth again so that I could make sure the white wash wasn’t too thick on the tops of the bricks.
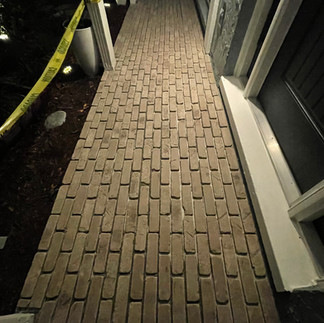
Here’s what they looked like after that:

I love the way the grout fills some of the gaps and texture of the bricks. I am so thrilled with how this project turned out and I’m even more thrilled to share it with you!
Here's the big reveal...

Frequently Asked Questions About Installing a Thin Brick Porch
Does thin brick hold up outside?
Yes! Thin brick is made from real clay brick that’s cut thinner, so you get the same durability and weather resistance as full brick. The key is using the right outdoor-rated adhesive and sealer. I used this sealer from Lowe’s to protect mine from moisture and stains.
Can you install thin brick over concrete?
Absolutely. That’s one of the most popular applications. Just make sure your surface is clean, level, and primed with a bonding agent or thin-set mortar before you start laying the sheets. You can get the thin-set mortar at Lowe's. Check out the following links to pick the best thin-set mortar for your job:
What kind of grout should I use for thin brick?
You can use regular sanded grout or a mortar mix. I went with this sanded grout and applied it using the float method. If you want tighter grout lines or a more rustic look, you can pipe it in instead.
Do I need to seal the brick after installation?
Yes—especially on outdoor porches or walkways. Sealing protects the grout and brick from weather, staining, and fading. I used 511 Impregnator Sealer, which is highly recommended for porous surfaces.
How do thin bricks compare to full bricks?
Thin brick gives you the same look with less weight and depth, which makes it easier for DIY installs and more versatile for porches, backsplashes, and accent walls. Full bricks are structural, but thin bricks are perfect for decorative projects like this one.
Can beginners do this project?
Yes! It’s very beginner-friendly. With some patience, the right tools, and good prep, this is a weekend project that can completely transform your porch. Pro tip: Grab a tile saw rental at your local Lowe's if you don’t own one. It makes trimming easy.
Have questions about this project? Feel free to message me! I’m here to help!